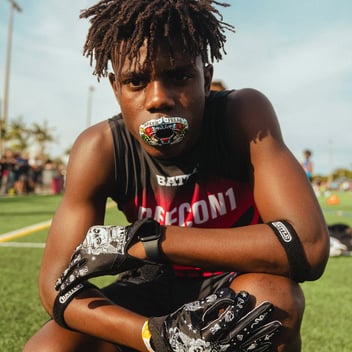
The humble mouthguard plays an important role in the safety of every football player. It's also a style statement, capable of making an instant impression on the field.
This critical piece of football equipment has changed a lot through the years, and thankfully, the old days of uncomfortable, stiff pieces of plastic (which required endless trimming and adjustments) are over. Today's mouthguards are surprisingly comfortable, and more importantly, they get the job done.
One of the biggest concerns through the years? Learning how to mold a football mouthguard. This process has evolved, and, at this point, it's pretty straightforward. Still, depending on which mouthguard you select, you may need a little guidance.
As a player-focused brand, we're here to help. Follow the steps below to learn how to properly mold your mouthguard. We'll also show you how to remold a football mouthguard. Once you master this skill, you'll score the perfect fit for game day.
Step 1. Choose the Right Mouthguard Style
Player choice is everything; athletes won't look or play their best if options for gear and drip are limited. Battle provides plenty of choices for every type of apparel and equipment, including a huge selection of mouthguards. These come in many styles for maximum player expression.
There's more to mouthguard selection than style alone. Other Battle mouthguard styles offer a no-boil design that's ready to use right out of the box. These are all ideal options when it comes to convenience, but some athletes may prefer to go an alternate route to get the most precise mouthguard fit.
There’s something to be said for the added precision and protection of the "boil and bite" design, which allows for a custom mold of the top set of teeth. Battle can hook players up with an Ultra-Fit or Ultra-Slim Mouthguard that can be molded and remolded to ensure the best fit. As always, there are dozens of sick styles to choose from.
Step 2. Get Heated
Now it's time to throw that mouthguard in the boiling water and let it swim for a bit. Heating the water is possible on the stovetop or in the microwave with the proper bowl — it really doesn't make much of a difference. The water just needs to get to a boil.
Once that water is boiling, toss the guard in for about 30 seconds. Make sure it doesn't touch anything but water. Next, fish it out with a slotted spoon and set it on a towel to cool down for a minute. Now it's time to set the mold. This needs to be completed quickly before the guard can cool down.
Step 3. Create the Mouthguard Mold
Pop that mouthguard in and press it up against your front teeth, followed by the back teeth. Use your hands and tongue to make sure the mouthguard is pressed firmly against all your top teeth.

Once a strong bond is formed, take a bite down so that the mouthguard can get a feel for the bottom teeth as well. With your mouth closed, bite down and suck out any excess water that may be hanging out inside the mouthguard, as well as any air left in your mouth. This will create a seal inside your mouth and allow the guard to get a tight grip on your grill.
Step 4. Let Your Mouthguard Chill Out
After the mouthguard feels good, let it chill out in a bowl of ice water for about 30 seconds. This process will set the mouthguard mold into place and lock it in for that first use on the field.
Step 5. Make Adjustments & Re-Mold If Needed
If any step in this process gets fumbled, don't panic: you can always start over. Football mouthguards can be re-molded, as long as they still fit properly in the end. The whole process of molding a football mouthguard is easy to learn — and a necessary step in getting on the field and back to the game. There's nothing wrong with a little practice along the way.
Step 6. Trim If Needed
Emphasis on if needed, because if your mouthguard fits well, you don’t want to mess with the original material construction. But if the fit seems too big or is uncomfortable in any parts of your mouth, grab a pair of scissors. Trim a small bit off the ends — where the guard will cover your back teeth — to ensure a perfect fit. If any other areas feel off, a well-placed trim can do the trick there as well.
Protect Your Grill & Look Your Best With Battle
Battle Sports is your one-stop shop for every type and style of mouthguard. From flashy and functional to ultra-slim and spinning with swag, any athlete in need of a safe and stylish mouthguard should look to Battle Sports for the best in the game.